Improvement For All

Category: DIY

4 Ways To Improve Your Home’s Curb Appeal

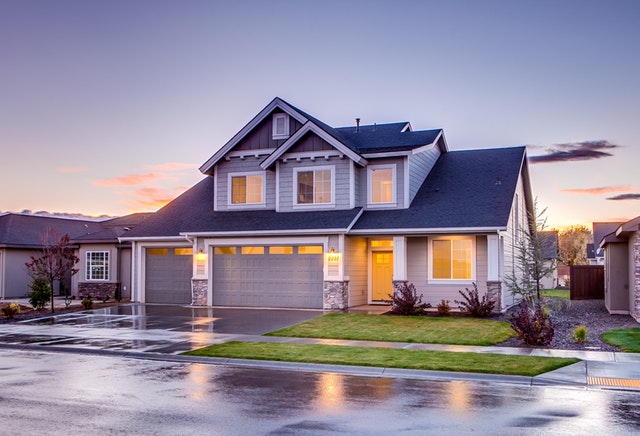
Selling your home can be an arduous process, but there are some things you can do to give your home an edge in a competitive market. Improve the first impression that buyers get by increasing your home’s curb appeal. A few minor updates can make a big difference.

1. Landscaping

You don’t have to spend a lot of money to add unique landscaping features. Start by trimming your shrubs and pruning the trees that you do have. Once you have cleaned everything up, you can embellish with new sod or a water features. Planter boxes are an easy way to add a splash of color to the front of your home.

2. Lighting

The most marketable houses are the ones that look great any time of the day. If someone is touring your house after they get off work, it still needs to look inviting. Architectural lighting design and manufacturing experts recommend adding striking light fixtures to the front of your home for a dramatic effect.

3. Painting

If the siding on your house looks worn, a new coat of paint may be all it needs to look as good as new. You can choose an eye-catching color combination. For example, a gray house with black trim and a yellow door is sure to capture buyers’ attention. 

4. Cleaning

One of the easiest things you can do to drastically improve the appearance of your home is simply to clean off the porch and sidewalk. You can rent power-washing equipment for a reasonable price. An hour or two of work is all it takes to make walkways look like new.

When you put your home on the market, you want to do everything in your power to make the sale go smoothly. Improving curb appeal is a great way to help your home stand out.

How to OTW: Replacing a Light Switch

Your light switch doesn’t work, but all the other lights on the same circuit do. It might be time to change the switch. But before you call an electrician you should give this job a go on your own because it’s truly is that easy. In this article I’ll go over what you need to do to get this job done. Before you get started its always important to kill the power to the circuit breaker and label the switch your dealing with so its easy to get the power going again.

Then move to the switch plate and unscrew the two exposed screws. The visually locate the wires so you can see what you’ll be working with. From here you’ll need to remove the switch itself from the wall to give yourself a little more space to work. This requires moving two more screws typically. Next you’ll need a circuit tester to make sure there isn’t any power running to the switch. If there is, its unsafe to work with it and you should double check the breaker. Once you’ve determined there is no power using your circuit tester you’re ready to move onto the next step.

Pull the switch out from the wall a few inches and take note of the two black power cables, both of which need to be removed by yet again unscrewing two philips heads. The third wire youll see is a copper ground and needs to be removed as well. At this point the hard part it over! Next get out your new switch which should look very similar to your initial switch. Follow the steps above in reverse order and you’ll be happy you didn’t call that electrician!

Page 2 of 2

Powered by WordPress & Theme by Anders Norén